So, you got your brand new Raspberry Pi and you want to play with it. But you realized that you don’t have a spare monitor, keyboard or a mouse. No worries. This should not stop you. There is a way to setup and work on a Raspberry Pi without connecting a monitor, keyboard or a mouse.
What you need
- Raspberry Pi 3 or Raspberry Pi 3 b+
- power supply
- micro SD card with minimum of 8 GB
- USB SD card reader
- access to a internet router
- another computer/laptop used to remotely connect to your Pi
Download Raspbian
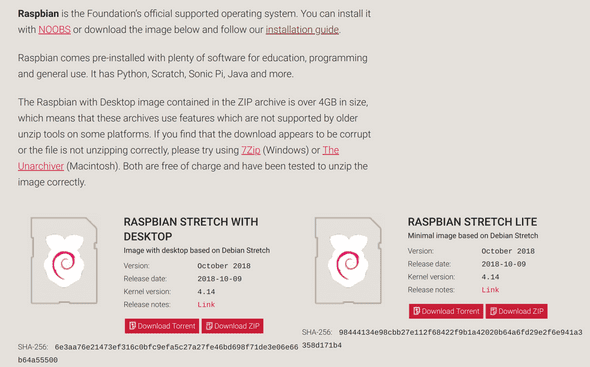
The first step is to download the Raspberry Pi’s operating system. You can download a zip from here. For this tutorial I will be using the “Raspbian Stretch with Desktop”.
Install the OS image on the SD card
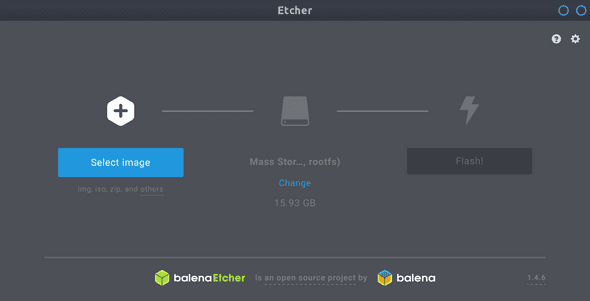
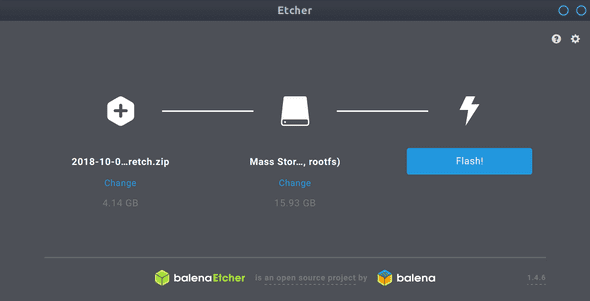
Next, we need to install the Raspbian Pi image on the SD card. To do this, we need an image writing software. For this tutorial I will be using Etcher. Etcher is a graphical SD card writing tool that is available for Windows, Mac OS and Linux.
- Download and install Etcher
- Connect the SD card to your computer using the USB card reader
- Open Etcher
- Select the Raspbian zip
- Select the SD card
- Click Flash
Enable SSH
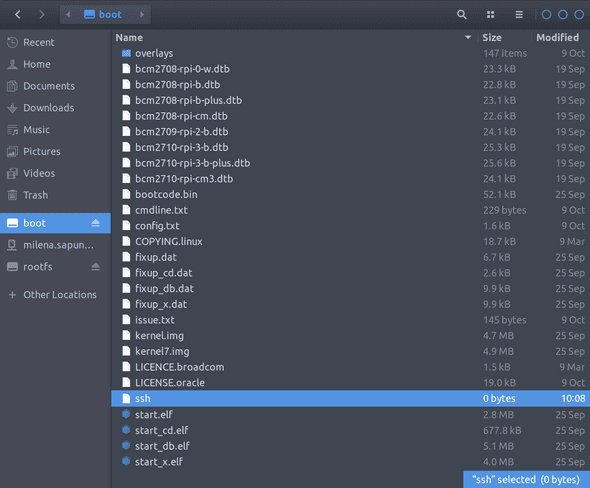
In order to access the Raspberry Pi remotely over the network, we need to enable the SSH on the operating system (it’s disabled by default). To do that create an ssh file (without any file extension) on the boot partition of the SD card.
If you are using a unix shell, navigate to the boot folder and type:
touch ssh
Configuring the WiFi connection
To make the Raspberry Pi connect automatically to your wireless network when booted, we need to create wpa_supplicant.conf file in the boot folder.
If you are using a unix shell, use the following command to create the file:
touch wpa_supplicant.confUsing your favorite editor, add the following content, where country is the country code (e.g. gb - United Kingdom, fr - France
de - Germany, us - United States, se - Sweden), ssid is the name of your WiFi-network and psk is the password:
country=us
update_config=1
ctrl_interface=/var/run/wpa_supplicant

network={
 scan_ssid=1
 ssid="network ssid"
 psk="password"
}
Boot
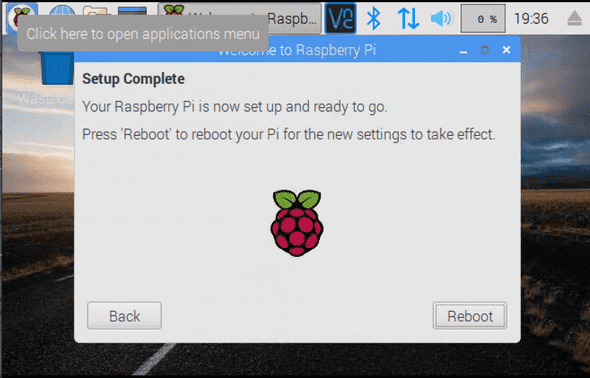
The next step is to insert the SD card and power up your Raspberry Pi. Wait until the light stops flashing.
Find your Pi’s IP Address
To connect to your Raspberry Pi via SSH, you need the IP address. You can find it on your Router webpage (DHCP tables) or alternatively you can use a network scanner. In this tutorial I assume that the device you are using to connect to the Pi is connected to the same network.
SSH into your Pi
Use your favorite SSH client (like PuTTY) to your Raspberry Pi. If your using a unix shell (where XXX.XXX.X.X is the Pi’s IP address):
The default credentials are:
username: pi
password: raspberry
Configure your Pi
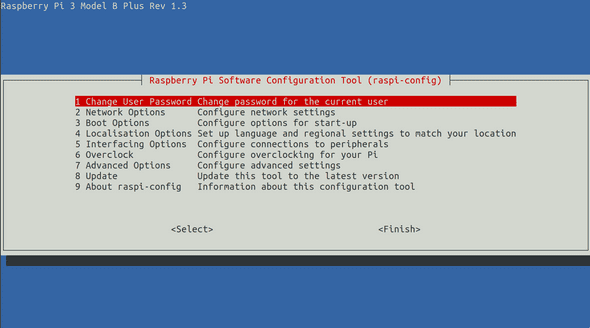
You can type sudo raspi-config to configure your Raspberry Pi. It is a good idea to change the default password. To do this choose the first item in the menu and enter the new password twice:
Enable graphical access - VNC (Optional)
If you are not comfortable working with the command line only, it is possible to access your Raspberry Pi’s desktop remotely. To enable remote graphical access:
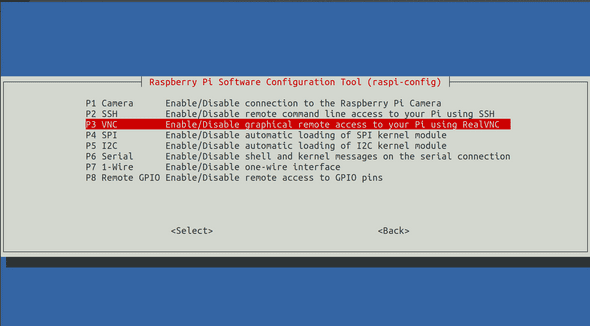
- type
sudo raspi-config - choose the fifth option Configure connections to peripherals.
- in the new menu choose VNC - Enable/Disable graphical remote access to your Pi using RealVNC
- choose Yes when asked if you want to enable VNC Server
VNC is a graphical desktop sharing system that allows you to remotely control the desktop interface of one computer (running VNC Server) from another device. VNC Viewer transmits the keyboard and either mouse or touch events to VNC Server, and receives updates to the screen in return. To access your Pi’s desktop remotely, you need a VNC client. For best results use the VNC Viewer, the compatible app from RealVNC. You can download it for free on www.realvnc.com.
After you have downloaded and installed VNC Viewer, you enter the Pi’s IP address and you are prompted for the password.